Donor Statements
Organization Name & Address
Your organization's name and address will appear at the top of the Donor Statements sheet. If it is incorrect, fix in your Settings sheet.
Select the Tax Year
The donor statement will only display transactions within your journal from the selected year.

Note: if your fiscal year does not start on January 1st, you will need to run statements in two separate workbooks since the IRS follows the calendar year, but giving for a single tax year will be in two workbooks.
Select the Donor
This dropdown lists any contacts associated with a revenue account in your journal.
Select the first contact in the dropdown. It will display their address from the Contacts sheet. If the address is incorrect or missing, fix the address in the Contacts sheet instead of directly on the donor statement.

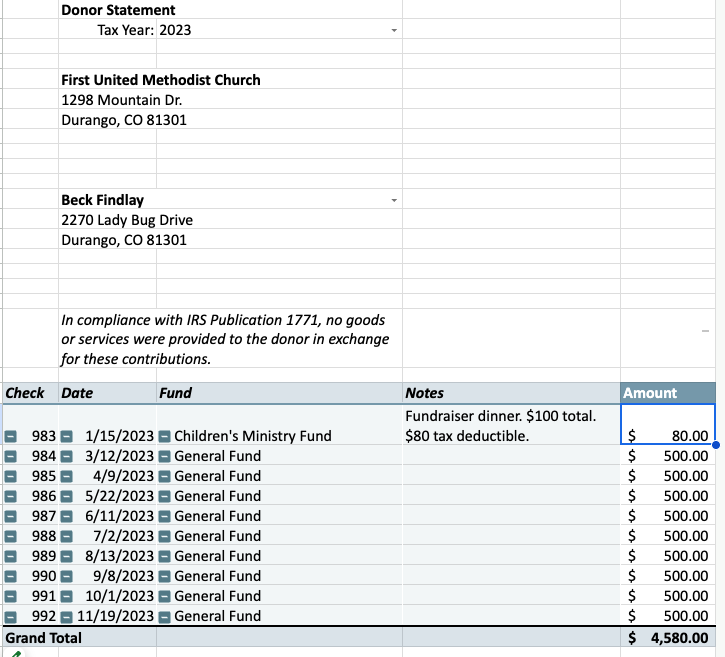
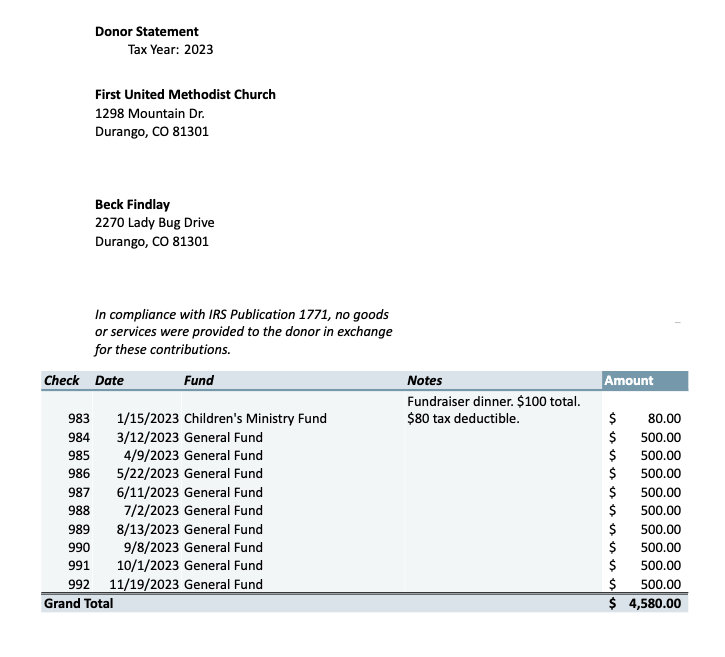
Donor Statement
All transactions to a revenue account for the selected contact will be shown, excluding any marked as NTD (not tax deductible) in your journal.
The columns and information shown comes directly from your journal. Any errors shown here must be fixed in your journal.
Printing for Window Envelopes
If users print via the Google Sheets file menu (not the browser's file menu!) with print settings: letter size, portrait, fit to width, normal margins (most of these are the default print settings), then makes the first fold near the faint gray line (above Amount), the donor’s address should be visible in a standard window envelope.
This assumes the user does not make any adjustments to columns or rows other than choosing a tax year and donor from their respective drop downs.
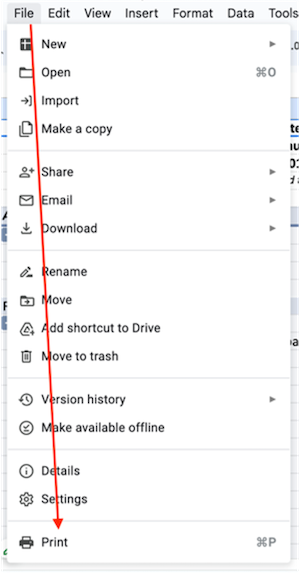
Printing a Donor Statement
Click File > Print within the Google Sheets file menu (below your browser's file menu).
Print Layout
It is recommended that you use these settings: letter size, portrait, fit to width, normal margins, and uncheck "show gridlines".
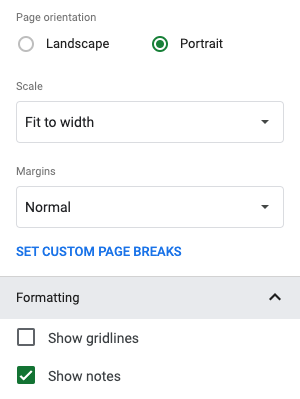
Print Preview
Use the print preview window to see how your settings change things until you get it the way you want.
The print settings you've selected will be remembered, so you won’t have to set them for each giving statement that you print.
Print to PDF or Paper
Click the blue Next button and you’ll be taken to your computer’s printer window.

There, you can send to your printer or save as a PDF if you plan to send digitally.
Repeat!
Repeat by going to the next donor in the contact dropdown.
Once complete, it's a good idea to go to your Annual Revenue by Tax Status report and verify that you printed a statement for all donors.
Thank You Notes
While you should include a thank you, don't type the thank you note in the giving statement before printing. This can cause formatting issues as you change from donor to donor.
Instead, print a separate thank you letter, add a hand-written thank you in the blank space after printing, or write a thank you card.