Entering Transactions
Overview
The Journal is where you'll enter all transactions for the year. You'll spend most of your time on this sheet.

Required Columns
Six columns are required for every transaction:
1) Date: if the date is not within the fiscal year (based on the date in Settings), the date will be highlighted in bright red (critical error).
2) Contact: a dropdown that will only allow contacts in your Contacts sheet. Add new contacts to your Contacts sheet as needed.
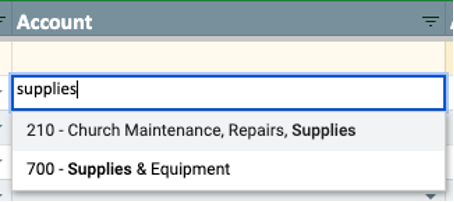
3) Account: a dropdown that will only allow accounts from your Accounts sheet.
4) Fund: a dropdown that will only allow funds from your Funds sheet. Add new funds to your Funds sheet with a $0 starting balance as needed.
5) Amount: increases to cash should be entered as positive values, decreases as negative values.
Most positive values will be to a revenue account, negative values to an expense account - if reversed, the amount will be highlighted in bright yellow (alert). This alert can be ignored in some cases (refunds, accruals).
6) Status: a dropdown field with two options - Posted (cleared) or Pending (not cleared).
This is to track the transaction's status with your bank account. Accurate statuses allow you to reconcile your journal to your bank account in the Reconciliation worksheet.
Optional Columns
1) Check: record check numbers here if desired.
2) NTD: if funds received are not tax deductible (NTD) for the donor, select the checkmark from the dropdown. This will exclude the transaction from their donor tax statement.
These are often called "quid pro quo" where the donor receives something in exchange for the funds they provide—like girl scout cookies!
3) Notes: you can enter any details you like for each transaction in this column. For donations, notes will be displayed in donor tax statements.
Journal Balance
This is the current balance of your Journal. It uses the total fund balance from your Funds sheet as the starting point for the year.
It is automatically updated whenever a new value is entered in the Amount column (both pending or posted statuses).
This value should not be edited directly. If it is wrong, you'll need to find the error (in your Journal or Funds sheet).
This balance will typically not match you bank balance. It's what your bank balance would be if all transactions in your journal were posted to your bank.
Split Transactions
Use as many rows as needed to allocate a single transaction across any number of accounts or funds.
Use the check and notes columns to indicate that the rows are all part of the same transaction.
Dropdown Fields
For all dropdown fields, you can click the dropdown icon to see the options listed alphabetically.
Or, start typing any words (or numbers) contained in the record you are looking for.
As you are typing, once the record you wish to select is closest to the active cell, click tab and the rest of the information will automatically fill the active cell.
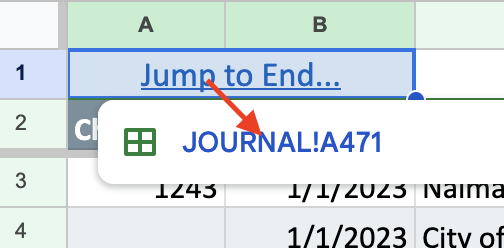
Jump to End
Each time you open your Journal worksheet, it will open at the top. The "Jump to End" link will take you to the bottom transaction in your Journal.
To enable this optional feature, you'll need to follow the directions in Settings.
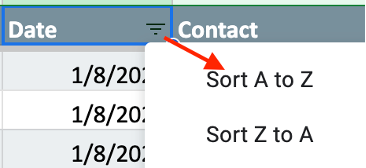
Sorting your Journal
Transactions do not need to be entered or displayed chronologically in your journal.
But, if you wish to sort your journal chronologically, click the dropdown in the Date header and click "Sort A to Z". You'll need to repeat if you add new transactions to your journal that are not in date order.
Frozen Header
The journal “freezes” the top header row containing the column labels (Check, Date, etc.). It's helpful to continue to see the column labels as you scroll down.
A common mistake for people unfamiliar with frozen header rows is to see the header row and assume they are at the top of their sheet and panic because it looks like much of their data is gone. Don’t panic. Just scroll back up. It’s all still there.